





Comprehensive Guide of Installing Wafer Type Valves on Pipelines
Key Features of Wafer Type Valves
Before we dive into the installation process, it's important to understand the characteristics of wafer-type valves that impact how they should be installed:
- Compact Design: Wafer-type valves are usually thinner and lighter than other types of valves, making them ideal for applications where space and weight are critical.
- Flange Connections: They are designed to be sandwiched between two flanges in a pipeline. This reduces the need for additional mechanical fastenings or heavy-duty flanges.
- Cost Efficiency: Due to their design, wafer-type valves are typically more cost-effective than their lugged counterparts, offering high performance at a lower price point.
Steps for Installing Wafer-Type Valves
1. Preparation
a. Safety and Precautions
Before starting the installation, ensure that the pipeline is isolated and de-pressurized. Take necessary precautions, including wearing safety gear such as gloves, goggles, and protective footwear. Lockout/tagout procedures should be followed if applicable.
b. Valve Inspection
Inspect the wafer valve before installation to ensure that it is in good condition and free from defects. Check for any shipping damages or irregularities in the body, seat, and seals. Also, ensure that the valve type, size, and material match the requirements of the pipeline.
2. Choosing the Right Flange
Wafer-type valves are typically designed to fit between two standard flanges, such as ANSI, DIN, or BS flanges. The flanges should match the valve’s face-to-face dimensions, bolt pattern, and pressure rating. Ensure that the flange surface is smooth and free from any dirt, debris, or rust.
If your pipeline system uses a different flange specification, ensure that you have the necessary adapters to match the wafer valve.
3. Aligning the Valve
a. Positioning the Valve
Wafer valves are designed to be positioned between two flanges. Carefully align the valve between the two flanges so that the valve faces and the flanges' bolt holes match. This is crucial for a proper seal once the flanges are bolted together. Some wafer valves may have an alignment mark, and it’s important to position the valve correctly to avoid any operational issues.
b. Seals and Gaskets
Place a gasket or seal on each side of the valve, between the valve and the flanges. These seals are essential for preventing leaks and ensuring a tight seal. Be sure to choose gaskets that are compatible with the pipeline’s material and the valve’s pressure and temperature specifications.
There are different types of gaskets to choose from, including rubber, PTFE, and metallic gaskets, depending on the system's requirements. It is essential to use the correct type of gasket for the system’s pressure and temperature range.
4. Bolt Installation
a. Bolting the Flanges
Once the wafer valve is positioned correctly between the flanges and the gaskets are in place, begin inserting the bolts through the flange bolt holes. Tighten the bolts evenly in a star pattern, starting with the bolts at opposite corners. This ensures even distribution of pressure on the gasket and valve, which is crucial for creating a uniform seal and preventing leaks.
Do not over-tighten the bolts, as this can damage the valve, flanges, or gasket. Follow the manufacturer’s recommended torque specifications for bolting the flanges.
b. Torque Specifications
The torque required to tighten the bolts will depend on the valve size, flange material, and the pressure rating of the pipeline. The manufacturer typically provides a torque chart that lists the correct torque values for different sizes and materials. Always use a calibrated torque wrench to ensure the correct level of tightness.
5. Check for Proper Alignment
Once the valve is installed and the bolts are tightened, check to ensure that the valve is properly aligned within the pipeline. The valve should be positioned symmetrically, with no signs of distortion or pressure points along the valve body. Misalignment can result in poor valve performance and even cause damage to the valve or pipeline over time.
6. Operational Testing
a. Leak Testing
After installation, perform a leak test to check for any leaks around the valve or flange connections. This can be done by pressurizing the pipeline to the normal operating pressure and inspecting for any signs of leakage. If a leak is found, release pressure, re-tighten the bolts, and re-check. If the leak persists, consider replacing the gasket or checking for defects in the flange faces.
b. Functional Test
Test the valve’s operation to ensure that it opens and closes properly. Wafer-type valves can come in different designs, including butterfly, ball, and check valves, so their operation might differ. For Butterfly Valves, ensure that the actuator (manual or automated) operates smoothly, and for check valves, confirm that the valve closes correctly to prevent reverse flow.
c. Pressure Test
For critical applications, you may need to conduct a pressure test to verify the valve’s performance under the specified conditions. This test should be conducted according to industry standards, such as the ASME or API standards, depending on the pipeline application.
7. Final Inspection and Commissioning
Once the valve is installed and tested, perform a final inspection to ensure that everything is in place and functioning properly. Make sure all bolt connections are tight, the valve operates smoothly, and there are no leaks. Once you’re satisfied, the valve is ready for full operation.
Best Practices for Wafer Valve Installation
To ensure that the wafer valve performs optimally throughout its lifecycle, consider the following best practices:
- Avoid Over-Tightening: Excessive tightening can damage the valve, flange, or gasket. Always use the recommended torque specifications.
- Proper Lubrication: If the valve uses moving parts, lubricate them according to the manufacturer’s instructions to prevent wear and tear.
- Avoid Mixing Flange Types: Wafer valves are designed for specific flange types. Ensure compatibility to avoid operational issues.
- Regular Maintenance: Periodically inspect the valve for leaks, wear, and corrosion. Replace gaskets and seals as necessary.
- Proper Alignment: Misalignment can cause uneven pressure on the valve and lead to premature failure. Always align the valve carefully during installation.
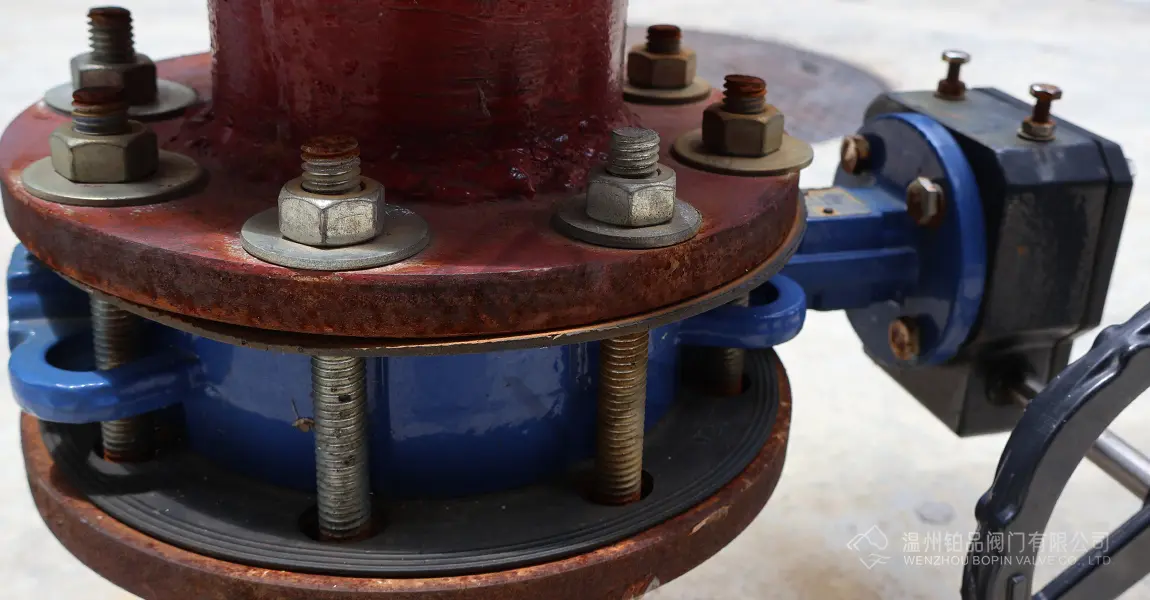
Installing a wafer-type valve involves a few straightforward steps, but each step is critical for ensuring the valve functions properly in the pipeline system. The installation process typically involves preparing the pipeline, aligning the valve, bolting the flanges, performing testing, and following industry best practices. By taking these precautions and adhering to manufacturer guidelines, you can ensure that your wafer-type valve operates effectively and delivers a long service life.